个人博客应用美化

后续可能 butterfly 和 hexo 框架会更新,而博客魔改过后,更新会覆盖原本改动过的文件,造成效果失效,甚至可能直接博客崩了也有可能,所以记录一下我用到过的各种博客美化效果,如果是 css+js 直接注入的话问题就不大,如果是直接修改 pug 等根目录文件的话可能就会出问题,总之防范于未然!

我更喜欢纯粹的 CSS+JS 更改效果的美化,所有需要引入他站内容的我一律不予以考虑,因为本来就是搭在 github page 上的个人小网站,搞太多花里胡哨的内容实在是本末倒置了,简单的 css+js 就可以满足大部分的美化需求了,而且开起来也快,不会有那种引用其他外链导致的各种问题。

pjax 也懒得配置,反正现在网站内容不大,暂且就这么用着,等到什么时候开始卡了再搞吧。

至于我个人的前段代码能力····,只能说和没有没什么区别,让我自己开发,自己魔改,那简直是天方夜谈。

目前所有的美化都是基于其他大佬的美化教程的修改,主要还是为了满足我的个人审美,不太喜欢那么多花里胡哨的特效,所以基本都会删一些内容的,属于是站在巨人的肩膀上了。

引用的大佬博客文章: Fomalhaut


纯 CSS+JS 美化

背景一图流

注意这个纯粹依靠 css 文件,所以文章开始图不会被正确显示!

其他的 一图流美化,但是需要改源文件(这个可以让文章图片显示在文章的开头)

需要增加插件脚本的 一图流美化 (注意一下,这篇文章中的 source/css 一律指的是 butterfly 根目录下的那个 source,而不是 blog 根目录下的那个,这个也可以显示文章图片)

1.在[BlogRoot]\source文件夹下新建一个文件夹css,该文件夹用于存放自定义的css样式,再新建一个名为custom.css,在里面写入以下代码:

1
2
3
4
5
6
7
8
9
10
11
12
13
14
15
16
17
18
19
20
21
22
23
/* 页脚与头图透明 */
#footer {
background: transparent !important;
}
#page-header {
background: transparent !important;
}

/* 白天模式遮罩透明 */
#footer::before {
background: transparent !important;
}
#page-header::before {
background: transparent !important;
}

/* 夜间模式遮罩透明 */
[data-theme="dark"] #footer::before {
background: transparent !important;
}
[data-theme="dark"] #page-header::before {
background: transparent !important;
}

2.在主题配置文件[BlogRoot]\_config.butterfly.yml文件中的inject配置项的head子项加入以下代码,代表引入刚刚创建的custom.css文件(这是相对路径的写法)

1
2
3
inject:
head:
- <link rel="stylesheet" href="/css/custom.css" media="defer" onload="this.media='all'">

3.在主题配置文件[BlogRoot]\_config.butterfly.yml文件中的index_imgfooter_bg配置项取消头图与页脚图的加载项避免冗余加载

1
2
3
4
5
# The banner image of home page
index_img:

# Footer Background
footer_bg: false

黑夜霓虹灯

1.在自定义的custom.css中添加如下代码,默认是左上角标题、中间标题和副标题,还有文章页头的标题和信息有循环霓虹灯,

1
2
3
4
5
6
7
8
9
10
11
12
13
14
15
16
17
18
19
20
21
22
23
24
25
26
27
28
29
30
31
32
33
34
35
36
37
38
39
40
41
42
43
44
45
46
47
48
49
50
51
52
53
54
55
56
57
58
59
60
61
62
63
64
65
66
67
68
69
70
71
72
73
74
75
76
77
78
79
80
81
82
83
84
85
86
87
88
89
90
91
92
93
94
95
96
97
98
99
100
101
102
103
104
105
106
107
108
109
110
111
112
113
114
115
116
117
/* 日间模式不生效 */
[data-theme="light"] #site-name,
[data-theme="light"] #site-title,
[data-theme="light"] #site-subtitle,
[data-theme="light"] #post-info {
animation: none;
}
/* 夜间模式生效 */
[data-theme="dark"] #site-name,
[data-theme="dark"] #site-title {
animation: light_15px 10s linear infinite;
}
[data-theme="dark"] #site-subtitle {
animation: light_10px 10s linear infinite;
}
[data-theme="dark"] #post-info {
animation: light_5px 10s linear infinite;
}
/* 关键帧描述 */
@keyframes light_15px {
0% {
text-shadow: #5636ed 0 0 15px;
}
12.5% {
text-shadow: #11ee5e 0 0 15px;
}
25% {
text-shadow: #f14747 0 0 15px;
}
37.5% {
text-shadow: #f1a247 0 0 15px;
}
50% {
text-shadow: #f1ee47 0 0 15px;
}
50% {
text-shadow: #b347f1 0 0 15px;
}
62.5% {
text-shadow: #002afa 0 0 15px;
}
75% {
text-shadow: #ed709b 0 0 15px;
}
87.5% {
text-shadow: #39c5bb 0 0 15px;
}
100% {
text-shadow: #5636ed 0 0 15px;
}
}

@keyframes light_10px {
0% {
text-shadow: #5636ed 0 0 10px;
}
12.5% {
text-shadow: #11ee5e 0 0 10px;
}
25% {
text-shadow: #f14747 0 0 10px;
}
37.5% {
text-shadow: #f1a247 0 0 10px;
}
50% {
text-shadow: #f1ee47 0 0 10px;
}
50% {
text-shadow: #b347f1 0 0 10px;
}
62.5% {
text-shadow: #002afa 0 0 10px;
}
75% {
text-shadow: #ed709b 0 0 10px;
}
87.5% {
text-shadow: #39c5bb 0 0 10px;
}
100% {
text-shadow: #5636ed 0 0 10px;
}
}

@keyframes light_5px {
0% {
text-shadow: #5636ed 0 0 5px;
}
12.5% {
text-shadow: #11ee5e 0 0 5px;
}
25% {
text-shadow: #f14747 0 0 5px;
}
37.5% {
text-shadow: #f1a247 0 0 15px;
}
50% {
text-shadow: #f1ee47 0 0 5px;
}
50% {
text-shadow: #b347f1 0 0 5px;
}
62.5% {
text-shadow: #002afa 0 0 5px;
}
75% {
text-shadow: #ed709b 0 0 5px;
}
87.5% {
text-shadow: #39c5bb 0 0 5px;
}
100% {
text-shadow: #5636ed 0 0 5px;
}
}

2.同理注入 inject 中的 head 部分即可


鼠标光晕

1.新建文件[BlogRoot]\source\js\cursor.js,在里面写上如下代码:

1
2
3
4
5
6
7
8
9
10
11
12
13
14
15
16
17
18
19
20
21
22
23
24
25
26
27
28
29
30
31
32
33
34
35
36
37
38
39
40
41
42
43
44
45
46
47
48
49
50
51
52
53
54
55
56
57
58
59
60
61
62
63
64
65
66
67
68
69
70
71
72
73
74
75
76
77
78
79
80
81
82
83
84
85
86
87
88
89
90
var CURSOR;

Math.lerp = (a, b, n) => (1 - n) * a + n * b;

const getStyle = (el, attr) => {
try {
return window.getComputedStyle
? window.getComputedStyle(el)[attr]
: el.currentStyle[attr];
} catch (e) {}
return "";
};

class Cursor {
constructor() {
this.pos = { curr: null, prev: null };
this.pt = [];
this.create();
this.init();
this.render();
}

move(left, top) {
this.cursor.style["left"] = `${left}px`;
this.cursor.style["top"] = `${top}px`;
}

create() {
if (!this.cursor) {
this.cursor = document.createElement("div");
this.cursor.id = "cursor";
this.cursor.classList.add("hidden");
document.body.append(this.cursor);
}

var el = document.getElementsByTagName("*");
for (let i = 0; i < el.length; i++)
if (getStyle(el[i], "cursor") == "pointer") this.pt.push(el[i].outerHTML);

document.body.appendChild((this.scr = document.createElement("style")));
// 这里改变鼠标指针的颜色 由svg生成
this.scr.innerHTML = `* {cursor: url("data:image/svg+xml,<svg xmlns='http://www.w3.org/2000/svg' viewBox='0 0 8 8' width='8px' height='8px'><circle cx='4' cy='4' r='4' opacity='.5'/></svg>") 4 4, auto}`;
}

refresh() {
this.scr.remove();
this.cursor.classList.remove("hover");
this.cursor.classList.remove("active");
this.pos = { curr: null, prev: null };
this.pt = [];

this.create();
this.init();
this.render();
}

init() {
document.onmouseover = (e) =>
this.pt.includes(e.target.outerHTML) &&
this.cursor.classList.add("hover");
document.onmouseout = (e) =>
this.pt.includes(e.target.outerHTML) &&
this.cursor.classList.remove("hover");
document.onmousemove = (e) => {
this.pos.curr == null && this.move(e.clientX - 8, e.clientY - 8);
this.pos.curr = { x: e.clientX - 8, y: e.clientY - 8 };
this.cursor.classList.remove("hidden");
};
document.onmouseenter = (e) => this.cursor.classList.remove("hidden");
document.onmouseleave = (e) => this.cursor.classList.add("hidden");
document.onmousedown = (e) => this.cursor.classList.add("active");
document.onmouseup = (e) => this.cursor.classList.remove("active");
}

render() {
if (this.pos.prev) {
this.pos.prev.x = Math.lerp(this.pos.prev.x, this.pos.curr.x, 0.15);
this.pos.prev.y = Math.lerp(this.pos.prev.y, this.pos.curr.y, 0.15);
this.move(this.pos.prev.x, this.pos.prev.y);
} else {
this.pos.prev = this.pos.curr;
}
requestAnimationFrame(() => this.render());
}
}

(() => {
CURSOR = new Cursor();
// 需要重新获取列表时,使用 CURSOR.refresh()
})();

2.在[BlogRoot]\source\css\custom.css添加如下代码:

1
2
3
4
5
6
7
8
9
10
11
12
13
14
15
16
17
18
19
20
21
22
23
24
25
26
27
28
29
30
31
32
33
34
35
36
/* 鼠标样式 */
#cursor {
position: fixed;
width: 16px;
height: 16px;
/* 这里改变跟随的底色 */
background: var(--theme-color);
border-radius: 8px;
opacity: 0.25;
z-index: 10086;
pointer-events: none;
transition: 0.2s ease-in-out;
transition-property: background, opacity, transform;
}

#cursor.hidden {
opacity: 0;
}

#cursor.hover {
opacity: 0.1;
transform: scale(2.5);
-webkit-transform: scale(2.5);
-moz-transform: scale(2.5);
-ms-transform: scale(2.5);
-o-transform: scale(2.5);
}

#cursor.active {
opacity: 0.5;
transform: scale(0.5);
-webkit-transform: scale(0.5);
-moz-transform: scale(0.5);
-ms-transform: scale(0.5);
-o-transform: scale(0.5);
}

3.在 inject 中引用这两个文件

1
2
3
4
5
inject:
head:
+ - <link rel="stylesheet" href="/css/custom.css">
bottom:
+ - <script defer src="/js/cursor.js"></script>

4.重启项目即可

页面样式美化

1.在 custom.css 中添加代码

1
2
3
4
5
6
7
8
9
10
11
12
13
14
15
16
17
18
19
20
21
22
23
24
25
26
27
28
29
30
31
32
33
34
35
36
37
38
39
40
41
42
43
44
45
46
47
48
49
50
51
52
53
54
55
56
57
58
59
60
61
62
63
64
65
66
67
68
69
70
71
72
73
74
75
76
77
:root {
--trans-light: rgba(255, 255, 255, 0.88);
--trans-dark: rgba(25, 25, 25, 0.88);
--border-style: 1px solid rgb(169, 169, 169);
--backdrop-filter: blur(5px) saturate(150%);
}

/* 首页文章卡片 */
#recent-posts > .recent-post-item {
background: var(--trans-light);
backdrop-filter: var(--backdrop-filter);
border-radius: 25px;
border: var(--border-style);
}

/* 首页侧栏卡片 */
#aside-content .card-widget {
background: var(--trans-light);
backdrop-filter: var(--backdrop-filter);
border-radius: 18px;
border: var(--border-style);
}

/* 文章页、归档页、普通页面 */
div#post,
div#page,
div#archive {
background: var(--trans-light);
backdrop-filter: var(--backdrop-filter);
border: var(--border-style);
border-radius: 20px;
}

/* 导航栏 */
#page-header.nav-fixed #nav {
background: rgba(255, 255, 255, 0.75);
backdrop-filter: var(--backdrop-filter);
}

[data-theme="dark"] #page-header.nav-fixed #nav {
background: rgba(0, 0, 0, 0.7) !important;
}

/* 夜间模式遮罩 */
[data-theme="dark"] #recent-posts > .recent-post-item,
[data-theme="dark"] #aside-content .card-widget,
[data-theme="dark"] div#post,
[data-theme="dark"] div#archive,
[data-theme="dark"] div#page {
background: var(--trans-dark);
}

/* 夜间模式页脚页头遮罩透明 */
[data-theme="dark"] #footer::before {
background: transparent !important;
}
[data-theme="dark"] #page-header::before {
background: transparent !important;
}

/* 阅读模式 */
.read-mode #aside-content .card-widget {
background: rgba(158, 204, 171, 0.5) !important;
}
.read-mode div#post {
background: rgba(158, 204, 171, 0.5) !important;
}

/* 夜间模式下的阅读模式 */
[data-theme="dark"] .read-mode #aside-content .card-widget {
background: rgba(25, 25, 25, 0.9) !important;
color: #ffffff;
}
[data-theme="dark"] .read-mode div#post {
background: rgba(25, 25, 25, 0.9) !important;
color: #ffffff;
}

2.参数说明:

  • --trans-light:白天模式带透明度的背景色,如rgba(255, 255, 255, 0.88)底色是纯白色,其中 0.88 就透明度,在 0-1 之间调节,值越大越不透明;

  • --trans-dark: 夜间模式带透明度的背景色,如rgba(25, 25, 25, 0.88)底色是柔和黑色,其中 0.88 就透明度,在 0-1 之间调节,值越大越不透明;

  • --border-style: 边框样式,1px solid rgb(169, 169, 169)指宽度为 1px 的灰色实体边框;

  • --backdrop-filter: 背景过滤器,如blur(5px) saturate(150%)表示饱和度为 150%的、高斯模糊半径为 5px 的过滤器,这是亚克力效果的一种实现方法;

  • 这里引用的是 fomalhaut 的样式

    3.inject 引用并且重启项目

节日弹窗与公祭日变灰

1.新建[BlogRoot]\source\js\day.js,并写入以下代码,这里公祭日灰度我设置的为60%

1
2
3
4
5
6
7
8
9
10
11
12
13
14
15
16
17
18
19
20
21
22
23
24
25
26
27
28
29
30
31
32
33
34
35
36
37
38
39
40
41
42
43
44
45
46
47
48
49
50
51
52
53
54
55
56
57
58
59
60
61
62
63
64
65
66
67
68
69
70
71
72
73
74
75
76
77
78
79
80
81
82
83
84
85
86
87
88
89
90
91
92
93
94
95
96
97
98
99
100
101
102
103
104
105
106
107
108
109
110
111
112
113
114
115
116
117
118
119
120
121
122
123
124
125
126
127
128
129
130
131
132
133
134
135
136
137
138
139
140
141
142
143
144
145
146
147
148
149
150
151
152
153
154
155
156
157
158
159
160
161
162
163
164
165
166
167
168
169
170
171
172
173
174
175
176
177
178
179
180
181
182
183
184
185
186
187
188
189
190
191
192
193
194
195
196
197
198
199
200
201
202
203
204
205
206
207
208
209
210
211
212
213
214
215
216
217
218
219
220
221
222
223
224
225
226
227
228
229
230
231
232
var d = new Date();
m = d.getMonth() + 1;
dd = d.getDate();
y = d.getFullYear();

// 公祭日
if (m == 9 && dd == 18) {
document
.getElementsByTagName("html")[0]
.setAttribute("style", "filter: grayscale(60%);");
if (sessionStorage.getItem("isPopupWindow") != "1") {
Swal.fire(
"今天是九一八事变" +
(y - 1931).toString() +
"周年纪念日\n🪔勿忘国耻,振兴中华🪔"
);
sessionStorage.setItem("isPopupWindow", "1");
}
}
if (m == 7 && dd == 7) {
document
.getElementsByTagName("html")[0]
.setAttribute("style", "filter: grayscale(60%);");
if (sessionStorage.getItem("isPopupWindow") != "1") {
Swal.fire(
"今天是卢沟桥事变" +
(y - 1937).toString() +
"周年纪念日\n🪔勿忘国耻,振兴中华🪔"
);
sessionStorage.setItem("isPopupWindow", "1");
}
}
if (m == 12 && dd == 13) {
document
.getElementsByTagName("html")[0]
.setAttribute("style", "filter: grayscale(60%);");
if (sessionStorage.getItem("isPopupWindow") != "1") {
Swal.fire(
"今天是南京大屠杀" +
(y - 1937).toString() +
"周年纪念日\n🪔勿忘国耻,振兴中华🪔"
);
sessionStorage.setItem("isPopupWindow", "1");
}
}
if (m == 8 && dd == 14) {
document
.getElementsByTagName("html")[0]
.setAttribute("style", "filter: grayscale(60%);");
if (sessionStorage.getItem("isPopupWindow") != "1") {
Swal.fire("今天是世界慰安妇纪念日\n🪔勿忘国耻,振兴中华🪔");
sessionStorage.setItem("isPopupWindow", "1");
}
}

// 节假日
if (m == 10 && dd <= 3) {
//国庆节
if (sessionStorage.getItem("isPopupWindow") != "1") {
Swal.fire("祝祖国" + (y - 1949).toString() + "岁生日快乐!");
sessionStorage.setItem("isPopupWindow", "1");
}
}
if (m == 8 && dd == 15) {
//搞来玩的,小日子投降
if (sessionStorage.getItem("isPopupWindow") != "1") {
Swal.fire("小日子已经投降" + (y - 1945).toString() + "年了😃");
sessionStorage.setItem("isPopupWindow", "1");
}
}
if (m == 1 && dd == 1) {
//元旦节
if (sessionStorage.getItem("isPopupWindow") != "1") {
Swal.fire(y.toString() + "年元旦快乐!🎉");
sessionStorage.setItem("isPopupWindow", "1");
}
}
if (m == 3 && dd == 8) {
//妇女节
if (sessionStorage.getItem("isPopupWindow") != "1") {
Swal.fire("各位女神们,妇女节快乐!👩");
sessionStorage.setItem("isPopupWindow", "1");
}
}
l = [
"非常抱歉,因为不可控原因,博客将于明天停止运营!",
"好消息,日本没了!",
"美国垮了,原因竟然是川普!",
"微软垮了!",
"你的电脑已经过载,建议立即关机!",
"你知道吗?站长很喜欢你哦!",
"一分钟有61秒哦",
"你喜欢的人跟别人跑了!",
];
if (m == 4 && dd == 1) {
//愚人节,随机谎话
if (sessionStorage.getItem("isPopupWindow") != "1") {
Swal.fire(l[Math.floor(Math.random() * l.length)]);
sessionStorage.setItem("isPopupWindow", "1");
}
}
if (m == 5 && dd == 1) {
//劳动节
if (sessionStorage.getItem("isPopupWindow") != "1") {
Swal.fire("劳动节快乐\n为各行各业辛勤工作的人们致敬!");
sessionStorage.setItem("isPopupWindow", "1");
}
}
if (m == 5 && dd == 4) {
//青年节
if (sessionStorage.getItem("isPopupWindow") != "1") {
Swal.fire("青年节快乐\n青春不是回忆逝去,而是把握现在!");
sessionStorage.setItem("isPopupWindow", "1");
}
}
if (m == 5 && dd == 20) {
//520
if (sessionStorage.getItem("isPopupWindow") != "1") {
Swal.fire("今年是520情人节\n快和你喜欢的人一起过吧!💑");
sessionStorage.setItem("isPopupWindow", "1");
}
}
if (m == 7 && dd == 1) {
//建党节
if (sessionStorage.getItem("isPopupWindow") != "1") {
Swal.fire("祝中国共产党" + (y - 1921).toString() + "岁生日快乐!");
sessionStorage.setItem("isPopupWindow", "1");
}
}
if (m == 9 && dd == 10) {
//教师节
if (sessionStorage.getItem("isPopupWindow") != "1") {
Swal.fire("各位老师们教师节快乐!👩‍🏫");
sessionStorage.setItem("isPopupWindow", "1");
}
}
if (m == 12 && dd == 25) {
//圣诞节
if (sessionStorage.getItem("isPopupWindow") != "1") {
Swal.fire("圣诞节快乐!🎄");
sessionStorage.setItem("isPopupWindow", "1");
}
}

//传统节日部分

if (
(y == 2023 && m == 4 && dd == 5) ||
(y == 2024 && m == 4 && dd == 4) ||
(y == 2025 && m == 4 && dd == 4)
) {
//清明节
if (sessionStorage.getItem("isPopupWindow") != "1") {
Swal.fire("清明时节雨纷纷,一束鲜花祭故人💐");
sessionStorage.setItem("isPopupWindow", "1");
}
}
if (
(y == 2023 && m == 12 && dd == 22) ||
(y == 2024 && m == 12 && dd == 21) ||
(y == 2025 && m == 12 && dd == 21)
) {
//冬至
if (sessionStorage.getItem("isPopupWindow") != "1") {
Swal.fire("冬至快乐\n快吃上一碗热热的汤圆和饺子吧🧆");
sessionStorage.setItem("isPopupWindow", "1");
}
}

var lunar = calendarFormatter.solar2lunar();

//农历采用汉字计算,防止出现闰月导致问题

if (
(lunar["IMonthCn"] == "正月" && lunar["IDayCn"] == "初六") ||
(lunar["IMonthCn"] == "正月" && lunar["IDayCn"] == "初五") ||
(lunar["IMonthCn"] == "正月" && lunar["IDayCn"] == "初四") ||
(lunar["IMonthCn"] == "正月" && lunar["IDayCn"] == "初三") ||
(lunar["IMonthCn"] == "正月" && lunar["IDayCn"] == "初二") ||
(lunar["IMonthCn"] == "正月" && lunar["IDayCn"] == "初一") ||
(lunar["IMonthCn"] == "腊月" && lunar["IDayCn"] == "三十") ||
(lunar["IMonthCn"] == "腊月" && lunar["IDayCn"] == "廿九")
) {
//春节,本来只有大年三十到初六,但是有时候除夕是大年二十九,所以也加上了
if (sessionStorage.getItem("isPopupWindow") != "1") {
Swal.fire(y.toString() + "年新年快乐\n🎊祝你心想事成,诸事顺利🎊");
sessionStorage.setItem("isPopupWindow", "1");
}
}
if (lunar["IMonthCn"] == "正月" && lunar["IDayCn"] == "十五") {
//元宵节
if (sessionStorage.getItem("isPopupWindow") != "1") {
Swal.fire("元宵节快乐\n送你一个大大的灯笼🧅");
sessionStorage.setItem("isPopupWindow", "1");
}
}
if (lunar["IMonthCn"] == "五月" && lunar["IDayCn"] == "初五") {
//端午节
if (sessionStorage.getItem("isPopupWindow") != "1") {
Swal.fire("端午节快乐\n请你吃一条粽子🍙");
sessionStorage.setItem("isPopupWindow", "1");
}
}
if (lunar["IMonthCn"] == "七月" && lunar["IDayCn"] == "初七") {
//七夕节
if (sessionStorage.getItem("isPopupWindow") != "1") {
Swal.fire("七夕节快乐\n黄昏后,柳梢头,牛郎织女来碰头");
sessionStorage.setItem("isPopupWindow", "1");
}
}
if (lunar["IMonthCn"] == "八月" && lunar["IDayCn"] == "十五") {
//中秋节
if (sessionStorage.getItem("isPopupWindow") != "1") {
Swal.fire("中秋节快乐\n请你吃一块月饼🍪");
sessionStorage.setItem("isPopupWindow", "1");
}
}
if (lunar["IMonthCn"] == "九月" && lunar["IDayCn"] == "初九") {
//重阳节
if (sessionStorage.getItem("isPopupWindow") != "1") {
Swal.fire("重阳节快乐\n独在异乡为异客,每逢佳节倍思亲");
sessionStorage.setItem("isPopupWindow", "1");
}
}

// 切换主题提醒
// if (y == 2022 && m == 12 && (dd >= 18 && dd <= 20)) {
// if (sessionStorage.getItem("isPopupWindow") != "1") {
// Swal.fire("网站换成冬日限定主题啦⛄");
// sessionStorage.setItem("isPopupWindow", "1");
// }
// }

2.由于有的节日是农历的,因此还要引入一个计算农历的代码,新建[BlogRoot]\source\js\lunar.js,并写入以下代码,太长了压缩了一下:

1
2
3
4
5
6
7
8
9
10
11
12
13
14
15
16
17
18
19
20
21
22
23
24
25
26
27
28
29
30
31
32
33
34
35
36
37
38
39
40
41
42
43
44
45
46
47
48
49
50
51
52
53
54
55
56
57
58
59
60
61
62
63
64
65
66
67
68
69
70
71
72
73
74
75
76
77
78
79
80
81
82
83
84
85
86
87
88
89
90
91
92
93
94
95
96
97
98
99
100
101
102
103
104
105
106
107
108
109
110
111
112
113
114
115
116
117
118
119
120
121
122
123
124
125
126
127
128
129
130
131
132
133
134
135
136
137
138
139
140
141
142
143
144
145
146
147
148
149
150
151
152
153
154
155
156
157
158
159
160
161
162
163
164
165
166
167
168
169
170
171
172
173
174
175
176
177
178
179
180
181
182
183
184
185
186
187
188
189
190
191
192
193
194
195
196
197
198
199
200
201
202
203
204
205
206
207
208
209
210
211
212
213
214
215
216
217
218
219
220
221
222
223
224
225
226
227
228
229
230
231
232
233
234
235
236
237
238
239
240
241
242
243
244
245
246
247
248
249
250
251
252
253
254
255
256
257
258
259
260
261
262
263
264
265
266
267
268
269
270
271
272
273
274
275
276
277
278
279
280
281
282
283
284
285
286
287
288
289
290
291
292
293
294
295
296
297
298
299
300
301
302
303
304
305
306
307
308
309
310
311
312
313
314
315
316
317
318
319
320
321
322
323
324
325
326
327
328
329
330
331
332
333
334
335
336
337
338
339
340
341
342
343
344
345
346
347
348
349
350
351
352
353
354
355
356
357
358
359
360
361
362
363
364
365
366
367
368
369
370
371
372
373
374
375
376
377
378
379
380
381
382
383
384
385
386
387
388
389
390
391
392
393
394
395
396
397
398
399
400
401
402
403
404
405
406
407
408
409
410
411
412
413
414
415
416
417
418
419
420
421
422
423
424
425
426
427
428
429
430
431
432
433
434
435
436
437
438
439
440
441
442
443
444
445
446
447
448
449
450
451
452
453
454
455
456
457
458
459
460
461
462
463
464
465
466
467
468
469
470
471
472
473
474
475
476
477
478
479
480
481
482
483
484
485
486
487
488
489
490
491
492
493
494
495
496
497
498
499
var lunarInfo = [
19416, 19168, 42352, 21717, 53856, 55632, 91476, 22176, 39632, 21970, 19168,
42422, 42192, 53840, 119381, 46400, 54944, 44450, 38320, 84343, 18800,
42160, 46261, 27216, 27968, 109396, 11104, 38256, 21234, 18800, 25958,
54432, 59984, 28309, 23248, 11104, 100067, 37600, 116951, 51536, 54432,
120998, 46416, 22176, 107956, 9680, 37584, 53938, 43344, 46423, 27808,
46416, 86869, 19872, 42416, 83315, 21168, 43432, 59728, 27296, 44710, 43856,
19296, 43748, 42352, 21088, 62051, 55632, 23383, 22176, 38608, 19925, 19152,
42192, 54484, 53840, 54616, 46400, 46752, 103846, 38320, 18864, 43380,
42160, 45690, 27216, 27968, 44870, 43872, 38256, 19189, 18800, 25776, 29859,
59984, 27480, 23232, 43872, 38613, 37600, 51552, 55636, 54432, 55888, 30034,
22176, 43959, 9680, 37584, 51893, 43344, 46240, 47780, 44368, 21977, 19360,
42416, 86390, 21168, 43312, 31060, 27296, 44368, 23378, 19296, 42726, 42208,
53856, 60005, 54576, 23200, 30371, 38608, 19195, 19152, 42192, 118966,
53840, 54560, 56645, 46496, 22224, 21938, 18864, 42359, 42160, 43600,
111189, 27936, 44448, 84835, 37744, 18936, 18800, 25776, 92326, 59984,
27424, 108228, 43744, 41696, 53987, 51552, 54615, 54432, 55888, 23893,
22176, 42704, 21972, 21200, 43448, 43344, 46240, 46758, 44368, 21920, 43940,
42416, 21168, 45683, 26928, 29495, 27296, 44368, 84821, 19296, 42352, 21732,
53600, 59752, 54560, 55968, 92838, 22224, 19168, 43476, 41680, 53584, 62034,
54560,
],
solarMonth = [31, 28, 31, 30, 31, 30, 31, 31, 30, 31, 30, 31],
Gan = ["甲", "乙", "丙", "丁", "戊", "己", "庚", "辛", "壬", "癸"],
Zhi = [
"子",
"丑",
"寅",
"卯",
"辰",
"巳",
"午",
"未",
"申",
"酉",
"戌",
"亥",
],
Animals = [
"鼠",
"牛",
"虎",
"兔",
"龙",
"蛇",
"马",
"羊",
"猴",
"鸡",
"狗",
"猪",
],
solarTerm = [
"小寒",
"大寒",
"立春",
"雨水",
"惊蛰",
"春分",
"清明",
"谷雨",
"立夏",
"小满",
"芒种",
"夏至",
"小暑",
"大暑",
"立秋",
"处暑",
"白露",
"秋分",
"寒露",
"霜降",
"立冬",
"小雪",
"大雪",
"冬至",
],
sTermInfo = [
"9778397bd097c36b0b6fc9274c91aa",
"97b6b97bd19801ec9210c965cc920e",
"97bcf97c3598082c95f8c965cc920f",
"97bd0b06bdb0722c965ce1cfcc920f",
"b027097bd097c36b0b6fc9274c91aa",
"97b6b97bd19801ec9210c965cc920e",
"97bcf97c359801ec95f8c965cc920f",
"97bd0b06bdb0722c965ce1cfcc920f",
"b027097bd097c36b0b6fc9274c91aa",
"97b6b97bd19801ec9210c965cc920e",
"97bcf97c359801ec95f8c965cc920f",
"97bd0b06bdb0722c965ce1cfcc920f",
"b027097bd097c36b0b6fc9274c91aa",
"9778397bd19801ec9210c965cc920e",
"97b6b97bd19801ec95f8c965cc920f",
"97bd09801d98082c95f8e1cfcc920f",
"97bd097bd097c36b0b6fc9210c8dc2",
"9778397bd197c36c9210c9274c91aa",
"97b6b97bd19801ec95f8c965cc920e",
"97bd09801d98082c95f8e1cfcc920f",
"97bd097bd097c36b0b6fc9210c8dc2",
"9778397bd097c36c9210c9274c91aa",
"97b6b97bd19801ec95f8c965cc920e",
"97bcf97c3598082c95f8e1cfcc920f",
"97bd097bd097c36b0b6fc9210c8dc2",
"9778397bd097c36c9210c9274c91aa",
"97b6b97bd19801ec9210c965cc920e",
"97bcf97c3598082c95f8c965cc920f",
"97bd097bd097c35b0b6fc920fb0722",
"9778397bd097c36b0b6fc9274c91aa",
"97b6b97bd19801ec9210c965cc920e",
"97bcf97c3598082c95f8c965cc920f",
"97bd097bd097c35b0b6fc920fb0722",
"9778397bd097c36b0b6fc9274c91aa",
"97b6b97bd19801ec9210c965cc920e",
"97bcf97c359801ec95f8c965cc920f",
"97bd097bd097c35b0b6fc920fb0722",
"9778397bd097c36b0b6fc9274c91aa",
"97b6b97bd19801ec9210c965cc920e",
"97bcf97c359801ec95f8c965cc920f",
"97bd097bd097c35b0b6fc920fb0722",
"9778397bd097c36b0b6fc9274c91aa",
"97b6b97bd19801ec9210c965cc920e",
"97bcf97c359801ec95f8c965cc920f",
"97bd097bd07f595b0b6fc920fb0722",
"9778397bd097c36b0b6fc9210c8dc2",
"9778397bd19801ec9210c9274c920e",
"97b6b97bd19801ec95f8c965cc920f",
"97bd07f5307f595b0b0bc920fb0722",
"7f0e397bd097c36b0b6fc9210c8dc2",
"9778397bd097c36c9210c9274c920e",
"97b6b97bd19801ec95f8c965cc920f",
"97bd07f5307f595b0b0bc920fb0722",
"7f0e397bd097c36b0b6fc9210c8dc2",
"9778397bd097c36c9210c9274c91aa",
"97b6b97bd19801ec9210c965cc920e",
"97bd07f1487f595b0b0bc920fb0722",
"7f0e397bd097c36b0b6fc9210c8dc2",
"9778397bd097c36b0b6fc9274c91aa",
"97b6b97bd19801ec9210c965cc920e",
"97bcf7f1487f595b0b0bb0b6fb0722",
"7f0e397bd097c35b0b6fc920fb0722",
"9778397bd097c36b0b6fc9274c91aa",
"97b6b97bd19801ec9210c965cc920e",
"97bcf7f1487f595b0b0bb0b6fb0722",
"7f0e397bd097c35b0b6fc920fb0722",
"9778397bd097c36b0b6fc9274c91aa",
"97b6b97bd19801ec9210c965cc920e",
"97bcf7f1487f531b0b0bb0b6fb0722",
"7f0e397bd097c35b0b6fc920fb0722",
"9778397bd097c36b0b6fc9274c91aa",
"97b6b97bd19801ec9210c965cc920e",
"97bcf7f1487f531b0b0bb0b6fb0722",
"7f0e397bd07f595b0b6fc920fb0722",
"9778397bd097c36b0b6fc9274c91aa",
"97b6b97bd19801ec9210c9274c920e",
"97bcf7f0e47f531b0b0bb0b6fb0722",
"7f0e397bd07f595b0b0bc920fb0722",
"9778397bd097c36b0b6fc9210c91aa",
"97b6b97bd197c36c9210c9274c920e",
"97bcf7f0e47f531b0b0bb0b6fb0722",
"7f0e397bd07f595b0b0bc920fb0722",
"9778397bd097c36b0b6fc9210c8dc2",
"9778397bd097c36c9210c9274c920e",
"97b6b7f0e47f531b0723b0b6fb0722",
"7f0e37f5307f595b0b0bc920fb0722",
"7f0e397bd097c36b0b6fc9210c8dc2",
"9778397bd097c36b0b70c9274c91aa",
"97b6b7f0e47f531b0723b0b6fb0721",
"7f0e37f1487f595b0b0bb0b6fb0722",
"7f0e397bd097c35b0b6fc9210c8dc2",
"9778397bd097c36b0b6fc9274c91aa",
"97b6b7f0e47f531b0723b0b6fb0721",
"7f0e27f1487f595b0b0bb0b6fb0722",
"7f0e397bd097c35b0b6fc920fb0722",
"9778397bd097c36b0b6fc9274c91aa",
"97b6b7f0e47f531b0723b0b6fb0721",
"7f0e27f1487f531b0b0bb0b6fb0722",
"7f0e397bd097c35b0b6fc920fb0722",
"9778397bd097c36b0b6fc9274c91aa",
"97b6b7f0e47f531b0723b0b6fb0721",
"7f0e27f1487f531b0b0bb0b6fb0722",
"7f0e397bd097c35b0b6fc920fb0722",
"9778397bd097c36b0b6fc9274c91aa",
"97b6b7f0e47f531b0723b0b6fb0721",
"7f0e27f1487f531b0b0bb0b6fb0722",
"7f0e397bd07f595b0b0bc920fb0722",
"9778397bd097c36b0b6fc9274c91aa",
"97b6b7f0e47f531b0723b0787b0721",
"7f0e27f0e47f531b0b0bb0b6fb0722",
"7f0e397bd07f595b0b0bc920fb0722",
"9778397bd097c36b0b6fc9210c91aa",
"97b6b7f0e47f149b0723b0787b0721",
"7f0e27f0e47f531b0723b0b6fb0722",
"7f0e397bd07f595b0b0bc920fb0722",
"9778397bd097c36b0b6fc9210c8dc2",
"977837f0e37f149b0723b0787b0721",
"7f07e7f0e47f531b0723b0b6fb0722",
"7f0e37f5307f595b0b0bc920fb0722",
"7f0e397bd097c35b0b6fc9210c8dc2",
"977837f0e37f14998082b0787b0721",
"7f07e7f0e47f531b0723b0b6fb0721",
"7f0e37f1487f595b0b0bb0b6fb0722",
"7f0e397bd097c35b0b6fc9210c8dc2",
"977837f0e37f14998082b0787b06bd",
"7f07e7f0e47f531b0723b0b6fb0721",
"7f0e27f1487f531b0b0bb0b6fb0722",
"7f0e397bd097c35b0b6fc920fb0722",
"977837f0e37f14998082b0787b06bd",
"7f07e7f0e47f531b0723b0b6fb0721",
"7f0e27f1487f531b0b0bb0b6fb0722",
"7f0e397bd097c35b0b6fc920fb0722",
"977837f0e37f14998082b0787b06bd",
"7f07e7f0e47f531b0723b0b6fb0721",
"7f0e27f1487f531b0b0bb0b6fb0722",
"7f0e397bd07f595b0b0bc920fb0722",
"977837f0e37f14998082b0787b06bd",
"7f07e7f0e47f531b0723b0b6fb0721",
"7f0e27f1487f531b0b0bb0b6fb0722",
"7f0e397bd07f595b0b0bc920fb0722",
"977837f0e37f14998082b0787b06bd",
"7f07e7f0e47f149b0723b0787b0721",
"7f0e27f0e47f531b0b0bb0b6fb0722",
"7f0e397bd07f595b0b0bc920fb0722",
"977837f0e37f14998082b0723b06bd",
"7f07e7f0e37f149b0723b0787b0721",
"7f0e27f0e47f531b0723b0b6fb0722",
"7f0e397bd07f595b0b0bc920fb0722",
"977837f0e37f14898082b0723b02d5",
"7ec967f0e37f14998082b0787b0721",
"7f07e7f0e47f531b0723b0b6fb0722",
"7f0e37f1487f595b0b0bb0b6fb0722",
"7f0e37f0e37f14898082b0723b02d5",
"7ec967f0e37f14998082b0787b0721",
"7f07e7f0e47f531b0723b0b6fb0722",
"7f0e37f1487f531b0b0bb0b6fb0722",
"7f0e37f0e37f14898082b0723b02d5",
"7ec967f0e37f14998082b0787b06bd",
"7f07e7f0e47f531b0723b0b6fb0721",
"7f0e37f1487f531b0b0bb0b6fb0722",
"7f0e37f0e37f14898082b072297c35",
"7ec967f0e37f14998082b0787b06bd",
"7f07e7f0e47f531b0723b0b6fb0721",
"7f0e27f1487f531b0b0bb0b6fb0722",
"7f0e37f0e37f14898082b072297c35",
"7ec967f0e37f14998082b0787b06bd",
"7f07e7f0e47f531b0723b0b6fb0721",
"7f0e27f1487f531b0b0bb0b6fb0722",
"7f0e37f0e366aa89801eb072297c35",
"7ec967f0e37f14998082b0787b06bd",
"7f07e7f0e47f149b0723b0787b0721",
"7f0e27f1487f531b0b0bb0b6fb0722",
"7f0e37f0e366aa89801eb072297c35",
"7ec967f0e37f14998082b0723b06bd",
"7f07e7f0e47f149b0723b0787b0721",
"7f0e27f0e47f531b0723b0b6fb0722",
"7f0e37f0e366aa89801eb072297c35",
"7ec967f0e37f14998082b0723b06bd",
"7f07e7f0e37f14998083b0787b0721",
"7f0e27f0e47f531b0723b0b6fb0722",
"7f0e37f0e366aa89801eb072297c35",
"7ec967f0e37f14898082b0723b02d5",
"7f07e7f0e37f14998082b0787b0721",
"7f07e7f0e47f531b0723b0b6fb0722",
"7f0e36665b66aa89801e9808297c35",
"665f67f0e37f14898082b0723b02d5",
"7ec967f0e37f14998082b0787b0721",
"7f07e7f0e47f531b0723b0b6fb0722",
"7f0e36665b66a449801e9808297c35",
"665f67f0e37f14898082b0723b02d5",
"7ec967f0e37f14998082b0787b06bd",
"7f07e7f0e47f531b0723b0b6fb0721",
"7f0e36665b66a449801e9808297c35",
"665f67f0e37f14898082b072297c35",
"7ec967f0e37f14998082b0787b06bd",
"7f07e7f0e47f531b0723b0b6fb0721",
"7f0e26665b66a449801e9808297c35",
"665f67f0e37f1489801eb072297c35",
"7ec967f0e37f14998082b0787b06bd",
"7f07e7f0e47f531b0723b0b6fb0721",
"7f0e27f1487f531b0b0bb0b6fb0722",
],
nStr1 = ["日", "一", "二", "三", "四", "五", "六", "七", "八", "九", "十"],
nStr2 = ["初", "十", "廿", "卅"],
nStr3 = [
"正",
"二",
"三",
"四",
"五",
"六",
"七",
"八",
"九",
"十",
"冬",
"腊",
];
function lYearDays(b) {
var f,
c = 348;
for (f = 32768; f > 8; f >>= 1) c += lunarInfo[b - 1900] & f ? 1 : 0;
return c + leapDays(b);
}
function leapMonth(b) {
return 15 & lunarInfo[b - 1900];
}
function leapDays(b) {
return leapMonth(b) ? (65536 & lunarInfo[b - 1900] ? 30 : 29) : 0;
}
function monthDays(b, f) {
return f > 12 || f < 1 ? -1 : lunarInfo[b - 1900] & (65536 >> f) ? 30 : 29;
}
function solarDays(b, f) {
if (f > 12 || f < 1) return -1;
var c = f - 1;
return 1 === c
? (b % 4 == 0 && b % 100 != 0) || b % 400 == 0
? 29
: 28
: solarMonth[c];
}
function toGanZhiYear(b) {
var f = (b - 3) % 10,
c = (b - 3) % 12;
return 0 === f && (f = 10), 0 === c && (c = 12), Gan[f - 1] + Zhi[c - 1];
}
function toAstro(b, f) {
return (
"魔羯水瓶双鱼白羊金牛双子巨蟹狮子处女天秤天蝎射手魔羯".substr(
2 * b -
(f < [20, 19, 21, 21, 21, 22, 23, 23, 23, 23, 22, 22][b - 1] ? 2 : 0),
2
) + "座"
);
}
function toGanZhi(b) {
return Gan[b % 10] + Zhi[b % 12];
}
function getTerm(b, f) {
if (b < 1900 || b > 2100) return -1;
if (f < 1 || f > 24) return -1;
var c = sTermInfo[b - 1900],
e = [
parseInt("0x" + c.substr(0, 5)).toString(),
parseInt("0x" + c.substr(5, 5)).toString(),
parseInt("0x" + c.substr(10, 5)).toString(),
parseInt("0x" + c.substr(15, 5)).toString(),
parseInt("0x" + c.substr(20, 5)).toString(),
parseInt("0x" + c.substr(25, 5)).toString(),
],
a = [
e[0].substr(0, 1),
e[0].substr(1, 2),
e[0].substr(3, 1),
e[0].substr(4, 2),
e[1].substr(0, 1),
e[1].substr(1, 2),
e[1].substr(3, 1),
e[1].substr(4, 2),
e[2].substr(0, 1),
e[2].substr(1, 2),
e[2].substr(3, 1),
e[2].substr(4, 2),
e[3].substr(0, 1),
e[3].substr(1, 2),
e[3].substr(3, 1),
e[3].substr(4, 2),
e[4].substr(0, 1),
e[4].substr(1, 2),
e[4].substr(3, 1),
e[4].substr(4, 2),
e[5].substr(0, 1),
e[5].substr(1, 2),
e[5].substr(3, 1),
e[5].substr(4, 2),
];
return parseInt(a[f - 1]);
}
function toChinaMonth(b) {
if (b > 12 || b < 1) return -1;
var f = nStr3[b - 1];
return (f += "月");
}
function toChinaDay(b) {
var f;
switch (b) {
case 10:
f = "初十";
break;
case 20:
f = "二十";
break;
case 30:
f = "三十";
break;
default:
(f = nStr2[Math.floor(b / 10)]), (f += nStr1[b % 10]);
}
return f;
}
function getAnimal(b) {
return Animals[(b - 4) % 12];
}
function solar2lunar(b, f, c) {
if (b < 1900 || b > 2100) return -1;
if (1900 === b && 1 === f && c < 31) return -1;
var e,
a,
r = null,
t = 0;
(b = (r = b ? new Date(b, parseInt(f) - 1, c) : new Date()).getFullYear()),
(f = r.getMonth() + 1),
(c = r.getDate());
var d =
(Date.UTC(r.getFullYear(), r.getMonth(), r.getDate()) -
Date.UTC(1900, 0, 31)) /
864e5;
for (e = 1900; e < 2101 && d > 0; e++) d -= t = lYearDays(e);
d < 0 && ((d += t), e--);
var n = new Date(),
s = !1;
n.getFullYear() === b &&
n.getMonth() + 1 === f &&
n.getDate() === c &&
(s = !0);
var u = r.getDay(),
o = nStr1[u];
0 === u && (u = 7);
var l = e;
a = leapMonth(e);
var i = !1;
for (e = 1; e < 13 && d > 0; e++)
a > 0 && e === a + 1 && !1 === i
? (--e, (i = !0), (t = leapDays(l)))
: (t = monthDays(l, e)),
!0 === i && e === a + 1 && (i = !1),
(d -= t);
0 === d && a > 0 && e === a + 1 && (i ? (i = !1) : ((i = !0), --e)),
d < 0 && ((d += t), --e);
var h = e,
D = d + 1,
g = f - 1,
v = toGanZhiYear(l),
y = getTerm(b, 2 * f - 1),
m = getTerm(b, 2 * f),
p = toGanZhi(12 * (b - 1900) + f + 11);
c >= y && (p = toGanZhi(12 * (b - 1900) + f + 12));
var M = !1,
T = null;
y === c && ((M = !0), (T = solarTerm[2 * f - 2])),
m === c && ((M = !0), (T = solarTerm[2 * f - 1]));
var I = toGanZhi(Date.UTC(b, g, 1, 0, 0, 0, 0) / 864e5 + 25567 + 10 + c - 1),
C = toAstro(f, c);
return {
lYear: l,
lMonth: h,
lDay: D,
Animal: getAnimal(l),
IMonthCn: (i ? "闰" : "") + toChinaMonth(h),
IDayCn: toChinaDay(D),
cYear: b,
cMonth: f,
cDay: c,
gzYear: v,
gzMonth: p,
gzDay: I,
isToday: s,
isLeap: i,
nWeek: u,
ncWeek: "星期" + o,
isTerm: M,
Term: T,
astro: C,
};
}
var calendarFormatter = {
solar2lunar: function (b, f, c) {
return solar2lunar(b, f, c);
},
lunar2solar: function (b, f, c, e) {
if ((e = !!e) && leapMonth !== f) return -1;
if ((2100 === b && 12 === f && c > 1) || (1900 === b && 1 === f && c < 31))
return -1;
var a = monthDays(b, f),
r = a;
if ((e && (r = leapDays(b, f)), b < 1900 || b > 2100 || c > r)) return -1;
for (var t = 0, d = 1900; d < b; d++) t += lYearDays(d);
var n = 0,
s = !1;
for (d = 1; d < f; d++)
(n = leapMonth(b)),
s || (n <= d && n > 0 && ((t += leapDays(b)), (s = !0))),
(t += monthDays(b, d));
e && (t += a);
var u = Date.UTC(1900, 1, 30, 0, 0, 0),
o = new Date(864e5 * (t + c - 31) + u);
return solar2lunar(o.getUTCFullYear(), o.getUTCMonth() + 1, o.getUTCDate());
},
};

3.引入以下以上两个 js 文件和一个弹窗依赖(注意顺序不能颠倒):

1
2
3
4
5
inject:
bottom:
+ - <script defer type="text/javascript" src="https://cdn1.tianli0.top/npm/sweetalert2@8.19.0/dist/sweetalert2.all.js"></script> # 节日弹窗依赖
+ - <script defer src="/js/lunar.js"></script> # 农历计算
+ - <script defer src="/js/day.js"></script> # 节日弹窗

我引用了 sweetalert2 后,开启速度会变的很慢,所以这里我其实删掉了绝大多数节日,也取消了弹窗,只保存了公祭日变黑的选项,保持简洁

头像呼吸灯

先说呼吸灯,这个可以用 css 实现,和上面的黑夜霓虹灯是一个原理的

1.在custom.css中插入以下代码

1
2
3
4
5
6
7
8
9
10
11
12
13
14
15
16
17
18
19
20
21
22
23
24
25
26
27
28
29
/* 头像呼吸灯 */
[data-theme="light"] .avatar-img {
animation: huxi_light 4s ease-in-out infinite;
}
[data-theme="dark"] .avatar-img {
animation: huxi_dark 4s ease-in-out infinite;
}
@keyframes huxi_light {
0% {
box-shadow: 0px 0px 1px 1px #e9f5fa;
}
50% {
box-shadow: 0px 0px 5px 5px #e9f5fa;
}
100% {
box-shadow: 0px 0px 1px 1px #e9f5fa;
}
}
@keyframes huxi_dark {
0% {
box-shadow: 0px 0px 1px 1px #39c5bb;
}
50% {
box-shadow: 0px 0px 5px 5px #39c5bb;
}
100% {
box-shadow: 0px 0px 1px 1px #39c5bb;
}
}

网站恶搞标题

1.新建文件[BlogRoot]\source\js\title.js,写入以下内容:

1
2
3
4
5
6
7
8
9
10
11
12
13
14
15
16
17
//动态标题
var OriginTitile = document.title;
var titleTime;
document.addEventListener("visibilitychange", function () {
if (document.hidden) {
//离开当前页面时标签显示内容
document.title = "跑哪里去了~";
clearTimeout(titleTime);
} else {
//返回当前页面时标签显示内容
document.title = "抓到你啦~";
//两秒后变回正常标题
titleTime = setTimeout(function () {
document.title = OriginTitile;
}, 2000);
}
});

2.在主题配置文件_config.butterfly.yml引入该文件:

1
2
3
inject:
bottom:
+ - <script async src="/js/title.js"></script>

3.重启项目

雪花特效

新建[BlogRoot]\source\js\snow.js,并写入以下代码,其中雪花的参数是可以自行调节的:

1
2
3
4
5
6
7
8
9
10
11
12
13
14
15
16
17
18
19
20
21
22
23
24
25
26
27
28
29
30
31
32
33
34
35
36
37
38
39
40
41
42
43
44
45
46
47
48
49
50
51
52
53
54
55
56
57
58
59
60
61
62
63
64
65
66
67
68
69
70
71
72
73
74
75
76
77
78
79
80
81
82
83
84
85
86
87
88
89
90
91
92
93
94
95
96
97
98
99
100
101
102
103
104
105
106
107
if (
navigator.userAgent.match(
/(phone|pad|pod|iPhone|iPod|ios|iPad|Android|Mobile|BlackBerry|IEMobile|MQQBrowser|JUC|Fennec|wOSBrowser|BrowserNG|WebOS|Symbian|Windows Phone)/i
)
) {
// 移动端不显示
} else {
// document.write('<canvas id="snow" style="position:fixed;top:0;left:0;width:100%;height:100%;z-index:-2;pointer-events:none"></canvas>');

window &&
(() => {
let e = {
flakeCount: 50, // 雪花数目
minDist: 150, // 最小距离
color: "255, 255, 255", // 雪花颜色
size: 1.5, // 雪花大小
speed: 0.5, // 雪花速度
opacity: 0.7, // 雪花透明度
stepsize: 0.5, // 步距
};
const t =
window.requestAnimationFrame ||
window.mozRequestAnimationFrame ||
window.webkitRequestAnimationFrame ||
window.msRequestAnimationFrame ||
function (e) {
window.setTimeout(e, 1e3 / 60);
};
window.requestAnimationFrame = t;
const i = document.getElementById("snow"),
n = i.getContext("2d"),
o = e.flakeCount;
let a = -100,
d = -100,
s = [];
(i.width = window.innerWidth), (i.height = window.innerHeight);
const h = () => {
n.clearRect(0, 0, i.width, i.height);
const r = e.minDist;
for (let t = 0; t < o; t++) {
let o = s[t];
const h = a,
w = d,
m = o.x,
c = o.y,
p = Math.sqrt((h - m) * (h - m) + (w - c) * (w - c));
if (p < r) {
const e = (h - m) / p,
t = (w - c) / p,
i = r / (p * p) / 2;
(o.velX -= i * e), (o.velY -= i * t);
} else
(o.velX *= 0.98),
o.velY < o.speed &&
o.speed - o.velY > 0.01 &&
(o.velY += 0.01 * (o.speed - o.velY)),
(o.velX += Math.cos((o.step += 0.05)) * o.stepSize);
(n.fillStyle = "rgba(" + e.color + ", " + o.opacity + ")"),
(o.y += o.velY),
(o.x += o.velX),
(o.y >= i.height || o.y <= 0) && l(o),
(o.x >= i.width || o.x <= 0) && l(o),
n.beginPath(),
n.arc(o.x, o.y, o.size, 0, 2 * Math.PI),
n.fill();
}
t(h);
},
l = (e) => {
(e.x = Math.floor(Math.random() * i.width)),
(e.y = 0),
(e.size = 3 * Math.random() + 2),
(e.speed = 1 * Math.random() + 0.5),
(e.velY = e.speed),
(e.velX = 0),
(e.opacity = 0.5 * Math.random() + 0.3);
};
document.addEventListener("mousemove", (e) => {
(a = e.clientX), (d = e.clientY);
}),
window.addEventListener("resize", () => {
(i.width = window.innerWidth), (i.height = window.innerHeight);
}),
(() => {
for (let t = 0; t < o; t++) {
const t = Math.floor(Math.random() * i.width),
n = Math.floor(Math.random() * i.height),
o = 3 * Math.random() + e.size,
a = 1 * Math.random() + e.speed,
d = 0.5 * Math.random() + e.opacity;
s.push({
speed: a,
velX: 0,
velY: a,
x: t,
y: n,
size: o,
stepSize: (Math.random() / 30) * e.stepsize,
step: 0,
angle: 180,
opacity: d,
});
}
h();
})();
})();
}

2.在自定义 css 文件custom.css写入如下代码,我这里设置只在白天模式显示,你可以自行设置,这里比较简单,本质就是调节画布的显示参数:

1
2
3
4
5
6
7
8
9
10
11
12
13
14
15
16
/* 雪花特效 */
[data-theme="light"] #snow {
display: block;
position: fixed;
left: 0;
top: 0;
width: 100%;
height: 100%;
pointer-events: none;
z-index: -2;
}

/* 雪花黑夜模式不显示 */
[data-theme="dark"] #snow {
display: none;
}

3.引入画布元素:在主题配置文件_config.butterfly.yml文件的引入 js 文件和一个canvas画布:

1
2
3
4
inject:
bottom:
+ - <canvas id="snow"></canvas> # 雪花画布
+ - <script async src="/js/snow.js"></script> # 雪花特效
  1. 重启项目即可看到效果

星空背景和流星特效

1.在[BlogRoot]/source/js目录下新建universe.js,输入以下代码:

1
2
3
4
5
6
7
8
9
10
11
12
13
14
15
16
17
18
19
20
21
22
23
24
25
26
27
28
29
30
31
32
33
34
35
36
37
38
39
40
41
42
43
44
45
46
47
48
49
50
51
52
53
54
55
56
57
58
59
60
61
62
63
64
65
66
67
68
69
70
71
72
73
74
75
76
77
78
79
80
81
82
83
84
85
86
87
88
89
90
91
92
93
94
95
96
97
98
99
100
101
102
103
104
105
106
107
108
109
110
111
112
113
function dark() {
window.requestAnimationFrame =
window.requestAnimationFrame ||
window.mozRequestAnimationFrame ||
window.webkitRequestAnimationFrame ||
window.msRequestAnimationFrame;
var n,
e,
i,
h,
t = 0.05,
s = document.getElementById("universe"),
o = !0,
a = "180,184,240",
r = "226,225,142",
d = "226,225,224",
c = [];
function f() {
(n = window.innerWidth),
(e = window.innerHeight),
(i = 0.216 * n),
s.setAttribute("width", n),
s.setAttribute("height", e);
}
function u() {
h.clearRect(0, 0, n, e);
for (var t = c.length, i = 0; i < t; i++) {
var s = c[i];
s.move(), s.fadeIn(), s.fadeOut(), s.draw();
}
}
function y() {
(this.reset = function () {
(this.giant = m(3)),
(this.comet = !this.giant && !o && m(10)),
(this.x = l(0, n - 10)),
(this.y = l(0, e)),
(this.r = l(1.1, 2.6)),
(this.dx = l(t, 6 * t) + (this.comet + 1 - 1) * t * l(50, 120) + 2 * t),
(this.dy = -l(t, 6 * t) - (this.comet + 1 - 1) * t * l(50, 120)),
(this.fadingOut = null),
(this.fadingIn = !0),
(this.opacity = 0),
(this.opacityTresh = l(0.2, 1 - 0.4 * (this.comet + 1 - 1))),
(this.do = l(5e-4, 0.002) + 0.001 * (this.comet + 1 - 1));
}),
(this.fadeIn = function () {
this.fadingIn &&
((this.fadingIn = !(this.opacity > this.opacityTresh)),
(this.opacity += this.do));
}),
(this.fadeOut = function () {
this.fadingOut &&
((this.fadingOut = !(this.opacity < 0)),
(this.opacity -= this.do / 2),
(this.x > n || this.y < 0) && ((this.fadingOut = !1), this.reset()));
}),
(this.draw = function () {
if ((h.beginPath(), this.giant))
(h.fillStyle = "rgba(" + a + "," + this.opacity + ")"),
h.arc(this.x, this.y, 2, 0, 2 * Math.PI, !1);
else if (this.comet) {
(h.fillStyle = "rgba(" + d + "," + this.opacity + ")"),
h.arc(this.x, this.y, 1.5, 0, 2 * Math.PI, !1);
for (var t = 0; t < 30; t++)
(h.fillStyle =
"rgba(" +
d +
"," +
(this.opacity - (this.opacity / 20) * t) +
")"),
h.rect(
this.x - (this.dx / 4) * t,
this.y - (this.dy / 4) * t - 2,
2,
2
),
h.fill();
} else
(h.fillStyle = "rgba(" + r + "," + this.opacity + ")"),
h.rect(this.x, this.y, this.r, this.r);
h.closePath(), h.fill();
}),
(this.move = function () {
(this.x += this.dx),
(this.y += this.dy),
!1 === this.fadingOut && this.reset(),
(this.x > n - n / 4 || this.y < 0) && (this.fadingOut = !0);
}),
setTimeout(function () {
o = !1;
}, 50);
}
function m(t) {
return Math.floor(1e3 * Math.random()) + 1 < 10 * t;
}
function l(t, i) {
return Math.random() * (i - t) + t;
}
f(),
window.addEventListener("resize", f, !1),
(function () {
h = s.getContext("2d");
for (var t = 0; t < i; t++) (c[t] = new y()), c[t].reset();
u();
})(),
(function t() {
document.getElementsByTagName("html")[0].getAttribute("data-theme") ==
"dark" && u(),
window.requestAnimationFrame(t);
})();
}
dark();

2.在[BlogRoot]/source/css目录下新建universe.css,输入以下代码:

1
2
3
4
5
6
7
8
9
10
11
12
13
14
15
16
/* 背景宇宙星光  */
#universe {
display: block;
position: fixed;
margin: 0;
padding: 0;
border: 0;
outline: 0;
left: 0;
top: 0;
width: 100%;
height: 100%;
pointer-events: none;
/* 这个是调置顶的优先级的,-1在文章页下面,背景上面,个人推荐这种 */
z-index: -1;
}

3.在主题配置文件_config.butterfly.ymlinject配置项中bottom下填入:

1
2
3
4
inject:
bottom:
- <canvas id="universe"></canvas>
- <script defer src="/js/universe.js"></script>

4.在主题配置文件_config.butterfly.ymlinject配置项中head下填入:

1
2
3
inject:
head:
- <link rel="stylesheet" href="/css/universe.css">

修改源文件的魔改

白天黑夜四个背景

1.修改代码 [Root]\themes\butterfly\layout\includes\layout.pug`

大概位置在 14 行左右

1
2
3
4
5
6
7
8
9
10
11
12
13
14
15
16
17
18
19
20
21
22
+ - var DefaultBg = page.defaultbg ? page.defaultbg : theme.background.default
+ - var DDMBg = theme.background.darkmode ? theme.background.darkmode : DefaultBg
+ - var DarkmodeBg = page.darkmodebg ? page.darkmodebg : DDMBg
if theme.background
#web_bg
+ if page.defaultbg || page.darkmodebg
+ style.
+ #web_bg{
+ background: #{DefaultBg} !important;
+ background-attachment: local!important;
+ background-position: center!important;
+ background-size: cover!important;
+ background-repeat: no-repeat!important;
+ }
+ [data-theme="dark"]
+ #web_bg{
+ background: #{DarkmodeBg} !important;
+ background-attachment: local!important;
+ background-position: center!important;
+ background-size: cover!important;
+ background-repeat: no-repeat!important;
+ }

2.再是实现手机端的白天黑夜双背景,在[BlogRoot]\themes\butterfly\source\css\_layout目录下新建一个web-bg.styl文件,写入以下内容:

1
2
3
4
5
6
7
8
9
10
11
12
13
14
15
16
17
18
19
20
21
22
23
24
$web-bg-night = hexo-config('background.darkmode') ? unquote(hexo-config('background.darkmode')) : $web-bg
$mobile-bg-day = hexo-config('background.mobileday') ? unquote(hexo-config('background.mobileday')) : $web-bg
$mobile-bg-night = hexo-config('background.mobilenight') ? unquote(hexo-config('background.mobilenight')) : $web-bg-night
[data-theme="dark"]
#web_bg
background: $web-bg-night
background-attachment: local
background-position: center
background-size: cover
background-repeat: no-repeat
@media screen and (max-width: 800px)
#web_bg
background: $mobile-bg-day !important
background-attachment: local !important
background-position: center !important
background-size: cover !important
background-repeat: no-repeat !important
[data-theme="dark"]
#web_bg
background: $mobile-bg-night !important
background-attachment: local !important
background-position: center !important
background-size: cover !important
background-repeat: no-repeat !important

3.然后还要修改一下[BlogRoot]\themes\butterfly\source\css\var.styl,大约 35 行的位置

1
2
3
4
  $text-line-height = 2
- $web-bg = hexo-config('background') && unquote(hexo-config('background'))
+ $web-bg = hexo-config('background.default') && unquote(hexo-config('background.default'))
$index_top_img_height = hexo-config('index_top_img_height') ? convert(hexo-config('index_top_img_height')) : 100vh

4.再修改一下配置项,在[BlogRoot]/_config.butterfly.yml中找到background配置项,内容改为:

1
2
3
4
5
6
7
8
# Website Background (設置網站背景)
# can set it to color or image (可設置圖片 或者 顔色)
# The formal of image: url(http://xxxxxx.com/xxx.jpg)
background:
default: #【必选】默认背景
darkmode: #【可选】PC端夜间模式背景
mobileday: #【可选】移动端日间默认背景
mobilenight: #【可选】移动端夜间模式背景

5.当开了Pjax,还要再把#web_bg加到pjax选择器中。修改[BlogRoot]\themes\butterfly\layout\includes\third-party\pjax.pug

1
2
3
4
5
6
7
8
9
10
11
  script(src=url_for(theme.CDN.pjax))
script.
let pjaxSelectors = [
'title',
'#config-diff',
'#body-wrap',
'#rightside-config-hide',
'#rightside-config-show',
+ '#web_bg',
'.js-pjax'
]

每页单独背景

这个魔改可能会与白天黑夜四背景产生冲突!

1.修改[BlogRoot]\themes\butterfly\layout\includes\layout.pug

1
2
3
4
5
6
  if theme.background
- #web_bg
+ if page.background
+ #web_bg(style=`background:`+ page.background + `;background-attachment: local;background-position: center;background-size: cover;background-repeat: no-repeat;`)
+ else
+ #web_bg

2.如此即可在每个页面的markdown文件的front-matter中使用background配置项单独配置页面背景了,不写或留空则使用主题配置文件中的默认背景。

1
2
3
4
5
6
7
---
title: 糖果屋微调合集
top_img:
cover: "https://npm.elemecdn.com/akilar-candyassets/image/20201115152231.png"
background: url(https://npm.elemecdn.com/akilar-candyassets/image/index.webp)
description: 将本站针对butterfly主题的亿点点小改动做个集锦。
---

3.当开了Pjax,还要再把#web_bg加到pjax选择器中。修改[BlogRoot]\themes\butterfly\layout\includes\third-party\pjax.pug

1
2
3
4
5
6
7
8
9
10
11
  script(src=url_for(theme.CDN.pjax))
script.
let pjaxSelectors = [
'title',
'#config-diff',
'#body-wrap',
'#rightside-config-hide',
'#rightside-config-show',
+ '#web_bg',
'.js-pjax'
]

右下角阅读百分比

注意,这部分内容我做了个人的修改,主要是发现现版本 butterfly 自带一个阅读百分比的功能,但是那个功能字体难看,并且百分比有延迟,滚轮一下不是一点点加,而是一下子加 3%~4%,很难看,所以我就修改了一下

1.修改文件[BlogRoot]\themes\butterfly\layout\includes\rightside.pug,在中间面插入如下代码(或者在_config.butterfly.yml 中
rightside_scroll_percent: false 的部分改成 true,保存运行一下再关掉,就会自动出来这一行代码。

1
2
3
button#go-up(type="button" title=_p("rightside.back_to_top"))
+ span#scroll-percent
i.fas.fa-arrow-up

2.新建文件[BlogRoot]\source\js\readPercent.js,在自定义 js 文件中加入如下代码:

1
2
3
4
5
6
7
8
9
10
11
12
13
14
15
16
17
18
19
20
21
22
23
24
25
window.onscroll = percent; // 执行函数
// 页面百分比
function percent() {
let a = document.documentElement.scrollTop || window, // 卷去高度
b =
Math.max(
document.body.scrollHeight,
document.documentElement.scrollHeight,
document.body.offsetHeight,
document.documentElement.offsetHeight,
document.body.clientHeight,
document.documentElement.clientHeight
) - document.documentElement.clientHeight, // 整个网页高度
result = Math.round((a / b) * 100), // 计算百分比
up = document.querySelector("#go-up"); // 获取按钮

if (result <= 95) {
up.childNodes[1].style.display = "none";
up.childNodes[0].style.display = "block";
up.childNodes[0].innerHTML = result;
} else {
up.childNodes[0].style.cssText = "display: none !important";
up.childNodes[1].style.cssText = "display: block !important";
}
}

3.创建 css 文件[BlogRoot]\source\css\readPercent.css写入如下代码:

1
2
3
4
5
6
7
8
9
10
11
12
13
14
15
16
17
18
19
20
/* 返回顶部 */
button#go-up i {
display: none !important;
}

button#go-up span {
display: block !important;
font-weight: bold;
font-size: 15px !important;
margin-right: -1px;
}

/* 鼠标滑动到按钮上时显示返回顶部图标 */
button#go-up:hover i {
display: block !important;
}

button#go-up:hover span {
display: none !important;
}

4.inject 导入 并且重启服务即可 不知道如何导入的见前两条。

直达底部按钮

[BlogRoot]\themes\butterfly\layout\includes\rightside.pug做以下修改:

1
2
3
4
5
button#go-up(type="button" title=_p("rightside.back_to_top"))
i.fas.fa-arrow-up

+button#go-down(type="button" title="直达底部" onclick="btf.scrollToDest(document.body.scrollHeight, 500)")
+ i.fas.fa-arrow-down

文章顶部波浪效果

1.修改 [BlogRoor]\themes/butterfly/layout/includes/header/index.pug 大概第 33 行左右

1
2
3
4
5
6
7
8
9
10
11
12
13
14
15
16
17
18
if top_img !== false
if is_post()
include ./post-info.pug
+ section.main-hero-waves-area.waves-area
+ svg.waves-svg(xmlns='http://www.w3.org/2000/svg', xlink='http://www.w3.org/1999/xlink', viewBox='0 24 150 28', preserveAspectRatio='none', shape-rendering='auto')
+ defs
+ path#gentle-wave(d='M -160 44 c 30 0 58 -18 88 -18 s 58 18 88 18 s 58 -18 88 -18 s 58 18 88 18 v 44 h -352 Z')
+ g.parallax
+ use(href='#gentle-wave', x='48', y='0')
+ use(href='#gentle-wave', x='48', y='3')
+ use(href='#gentle-wave', x='48', y='5')
+ use(href='#gentle-wave', x='48', y='7')
#post-top-cover
img#post-top-bg(class='nolazyload' src=bg_img)
else if is_home()
#site-info
h1#site-title=site_title
if theme.subtitle.enable

2.然后在_config.butterfly.yml[inject.head] 或者自定义 css 中 引入以下 css

1
2
3
4
5
6
7
8
9
10
11
12
13
14
15
16
17
18
19
20
21
22
23
24
25
26
27
28
29
30
31
32
33
34
35
36
37
38
39
40
41
42
43
44
45
46
47
48
49
50
51
52
53
54
55
56
57
58
59
60
61
62
63
64
65
66
67
68
69
70
71
72
73
74
/* 波浪css */
.main-hero-waves-area {
width: 100%;
position: absolute;
left: 0;
bottom: -11px;
z-index: 5;
}
.waves-area .waves-svg {
width: 100%;
height: 5rem;
}
/* Animation */

.parallax > use {
animation: move-forever 25s cubic-bezier(0.55, 0.5, 0.45, 0.5) infinite;
}
.parallax > use:nth-child(1) {
animation-delay: -2s;
animation-duration: 7s;
fill: #f7f9febd;
}
.parallax > use:nth-child(2) {
animation-delay: -3s;
animation-duration: 10s;
fill: #f7f9fe82;
}
.parallax > use:nth-child(3) {
animation-delay: -4s;
animation-duration: 13s;
fill: #f7f9fe36;
}
.parallax > use:nth-child(4) {
animation-delay: -5s;
animation-duration: 20s;
fill: #f7f9fe;
}
/* 黑色模式背景 */
[data-theme="dark"] .parallax > use:nth-child(1) {
animation-delay: -2s;
animation-duration: 7s;
fill: #18171dc8;
}
[data-theme="dark"] .parallax > use:nth-child(2) {
animation-delay: -3s;
animation-duration: 10s;
fill: #18171d80;
}
[data-theme="dark"] .parallax > use:nth-child(3) {
animation-delay: -4s;
animation-duration: 13s;
fill: #18171d3e;
}
[data-theme="dark"] .parallax > use:nth-child(4) {
animation-delay: -5s;
animation-duration: 20s;
fill: #18171d;
}

@keyframes move-forever {
0% {
transform: translate3d(-90px, 0, 0);
}
100% {
transform: translate3d(85px, 0, 0);
}
}
/*Shrinking for mobile*/
@media (max-width: 768px) {
.waves-area .waves-svg {
height: 40px;
min-height: 40px;
}
}

3.重启项目

这个效果不知道为啥我按照教程装上后一点效果都没有···所以暂且停止使用这个,我使用背景一图流那个方案解决 top-img 和背景割裂的问题


Hexo 博客的迁移

将博客迁移到新的电脑

参考教程:CSDN:Hexo 博客迁移到新电脑

  1. 在新电脑行进行环境准备工作,具体的步骤和Hexo 博客搭建基础教程(一)的第 1-7 步一模一样,大家在新电脑上跟着做即可(注意千万不要做第 8 步,hexo init blog-demo这一步会覆盖并还原你原本的的源码文件)

  2. 这时候新建一个文件夹new-blog,用来装你的新博客源码的,进入这个文件夹,准备复制我们旧的博客源码进来,我们可以看到旧的博客项目结构是如下样子的:

    image.webp

    这里红框内的都是需要复制迁移到新的博客的,具体的要不要保留见下表:

    需要复制的 需要删除的
    _config.yml:站点配置文件 .git:无论是在站点根目录下,还是主题目录下的.git 文件,都可以删掉
    _config.butterfly.yml:主题配置文件,为了方便主题升级剥离出来的配置文件 node_modules:npm install会根据 package.json 生成
    package.json:说明使用哪些依赖包 public:hexo g会重新编译生成
    scaffolds:文章的模板 .deploy_git:在使用hexo d时也会重新生成
    source:自己写的博客源码 db.json 文件:hexo s快速启动所需的数据库
    themes:主题文件夹(魔改都在里面啦) package-lock.json:记录依赖之间的内部依赖关系,可以根据package.json重新生成
    .gitignore:说明在提交时哪些文件可以忽略
  3. 复制所需的文件到新电脑的文件夹之后,在git bash中切换目录到新拷贝的文件夹里,使用npm install 命令,进行模块安装。这里绝对不能使用hexo init初始化,因为有的文件我们已经拷贝生成过来了,所以不必用hexo init去整体初始化,如果不慎用了,则站点的配置文件_config.yml里面内容会被重置,所以这一步一定要慎重:

    1
    npm install
  4. 执行以下命令情况并启动项目,进入localhost:4000进行验证:

    1
    hexo cl; hexo g; hexo s
  5. 当本地能成功启动,之后就可以部署到 Github,执行以下代码:

    1
    hexo d

    如果出现Deploy done,则说明部署成功,稍等两分钟,打开浏览器访问之前的域名就可以看到之前的博客,以后你可以在这台新电脑上魔改和写文章了~

注意,重装电脑后,如果你的文件全都没有发生变化,那么你需要做的是:

1.重新配置git选项:

1
2
git config --global user.name "你的用户名"
git config --global user.email "你的邮箱"

2.重新获取sshkey并且填写到你的github上

1
ssh-keygen -t rsa -C "你的邮箱"

之后打开C盘下用户文件夹下的.ssh的文件夹,会看到 id_rsa.pub

公钥
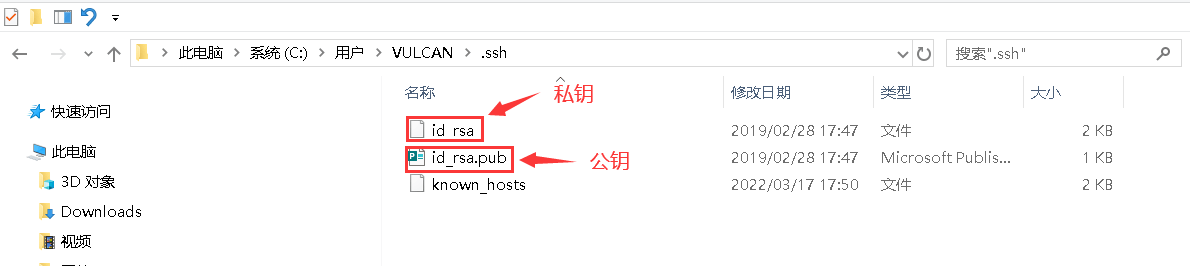
用记事本打开上述图片中的公钥(id_rsa.pub),复制里面的内容,然后开始在github中配置ssh密钥。

进入github,点击右上角头像 选择settings,进入设置页后选择 SSH and GPG keys,名字随便起,公钥填到Key那一栏。

3.第三步 尝试将你的本地文件进行提交,会提醒你这个仓库不可信,按照

1
git config --add safe.directory '*'

设置就好

4.记得使用hexo s尝试本地部署,并且记得配置你的本地nodejs npm 和你的hexo的安装

1
npm install -g hexo-cli

Github Action 实现自动部署

参考教程:使用 Github Action 实现全自动部署

Github Action 简介

每次部署Hexo都需要运行指令三件套,随着文章越来越多,编译的时间也随之越来越长,通过Github Action,我们只需要在每次完成博客的编写或修改以后,将改动直接push到远程仓库,之后的编译部署的工作统统交给CI来完成即可

1
2
3
4
5
[GITHUBTOKEN]:15076c8eb9c874sad676bc9bfb13sadw86babf2

[GITHUBEMAIL]:xxxxxxxxx@qq.com

[GITHUBUSERNAME]:moranmanforgithub

获取 Token

为了确保交由Github Action来持续部署时,Github Action具备足够的权限来进行hexo deploy操作,需要先获取Token

Github –> 右上角头像 –>settings–> 下拉到最下面 developer settings —> 三个选项中最后一个 Personal access tokens

选择下面那个 Tokens(classic)

左上角选 Generate new tokens

名字随便起,但是要 repo / workflow 选项必须勾选

生成后立刻记住,保存起来。

创建存放源码的私有仓库

Create a new repository 选择 private

配置 Github Action

1.在[Blogroot]新建.github文件夹,注意开头是有个.的。然后在.github内新建workflows文件夹,再在workflows文件夹内新建autodeploy.yml,在[Blogroot]/.github/workflows/autodeploy.yml里面输入

1
2
3
4
5
6
7
8
9
10
11
12
13
14
15
16
17
18
19
20
21
22
23
24
25
26
27
28
29
30
31
32
33
34
35
36
37
38
39
40
41
42
43
44
45
46
47
48
49
50
51
52
53
54
55
56
57
58
59
# 当有改动推送到master分支时,启动Action
name: 自动部署

on:
push:
branches:
- master #2020年10月后github新建仓库默认分支改为main,注意更改

release:
types:
- published

jobs:
deploy:
runs-on: ubuntu-latest
steps:
- name: 检查分支
uses: actions/checkout@v2
with:
ref: master #2020年10月后github新建仓库默认分支改为main,注意更改

- name: 安装 Node
uses: actions/setup-node@v1
with:
node-version: "12.x" #action使用的node版本,建议大版本和本地保持一致。可以在本地用node -v查询版本号。

- name: 安装 Hexo
run: |
export TZ='Asia/Shanghai'
npm install hexo-cli -g

- name: 缓存 Hexo
uses: actions/cache@v1
id: cache
with:
path: node_modules
key: ${{runner.OS}}-${{hashFiles('**/package-lock.json')}}

- name: 安装依赖
if: steps.cache.outputs.cache-hit != 'true'
run: |
npm install --save

- name: 生成静态文件
run: |
hexo clean
hexo generate

- name: 部署 #此处master:master 指从本地的master分支提交到远程仓库的master分支,若远程仓库没有对应分支则新建一个。如有其他需要,可以根据自己的需求更改。
run: |
cd ./public
git init
git config --global user.name '${{ secrets.GITHUBUSERNAME }}'
git config --global user.email '${{ secrets.GITHUBEMAIL }}'
git add .
git commit -m "${{ github.event.head_commit.message }} $(date +"%Z %Y-%m-%d %A %H:%M:%S") Updated By Github Actions"
git push --force --quiet "https://${{ secrets.GITHUBUSERNAME }}:${{ secrets.GITHUBTOKEN }}@github.com/${{ secrets.GITHUBUSERNAME }}/${{ secrets.GITHUBUSERNAME }}.github.io.git" master:master
#git push --force --quiet "https://${{ secrets.TOKENUSER }}:${{ secrets.CODINGTOKEN }}@e.coding.net/${{ secrets.CODINGUSERNAME }}/${{ secrets.CODINGBLOGREPO }}.git" master:master #coding部署写法,需要的自行取消注释
#git push --force --quiet "https://${{ secrets.GITEEUSERNAME }}:${{ secrets.GITEETOKEN }}@gitee.com/${{ secrets.GITEEUSERNAME }}/${{ secrets.GITEEUSERNAME }}.git" master:master #gitee部署写法,需要的自行取消注释

新仓库默认的分支是 main,你可以选择修改分支名称为 master 方便后续管理

打开 code 页面, 左边头像下方 有个 main 分支,点开 点 view all branches 在 default 中右边三个点,点开就有 rename branch

重设远程仓库与分支

1.删除或者先把[Blogroot]/themes/butterfly/.git移动到非博客文件夹目录下,原因是主题文件夹下的.git文件夹的存在会导致其被识别成子项目,从而无法被上传到源码仓库。

2.在博客根目录[Blogroot]路径下运行指令

1
2
3
4
5
6
git init #初始化
git remote add origin git@github.com:[GithubUsername]/[SourceRepo].git #[SourceRepo]为存放源码的github私有仓库
git checkout -b master # 切换到master分支,
#2020年10月后github新建仓库默认分支改为main,注意更改
# 如果不是,后面的所有设置的分支记得保持一致
# 注意这里的[] 仅做说明, 实际上是 mrmanforgithub/xxx.git 无需加入[]

3.添加屏蔽项
因为能够使用指令进行安装的内容不包括在需要提交的源码内,所有我们需要将这些内容添加到屏蔽项,表示不上传到 github 上。这样可以显著减少需要提交的文件量和加快提交速度。
打开[Blogroot]/.gitignore,输入以下内容:

1
2
3
4
5
6
7
8
9
10
.DS_Store
Thumbs.db
db.json
*.log
node_modules/
public/
.deploy*/
.deploy_git*/
.idea
themes/butterfly/.git

检验是否成功

打开你的私有仓库 找到 action,找到自动部署,点击 deploy,查看是否全部打勾

提交仓库的代码

代码三件套:

1
2
3
hexo cl
hexo g
hexo d

变为:

1
2
3
git add .
git commit -m "修改名称"
git push origin master

写在最后

魔改需谨慎哦,出错了记得及时回滚,就不会有事啦~

希望你也能建出属于自己的好看的博客!BYE~~~( ̄ ▽  ̄)~*